 Pin it
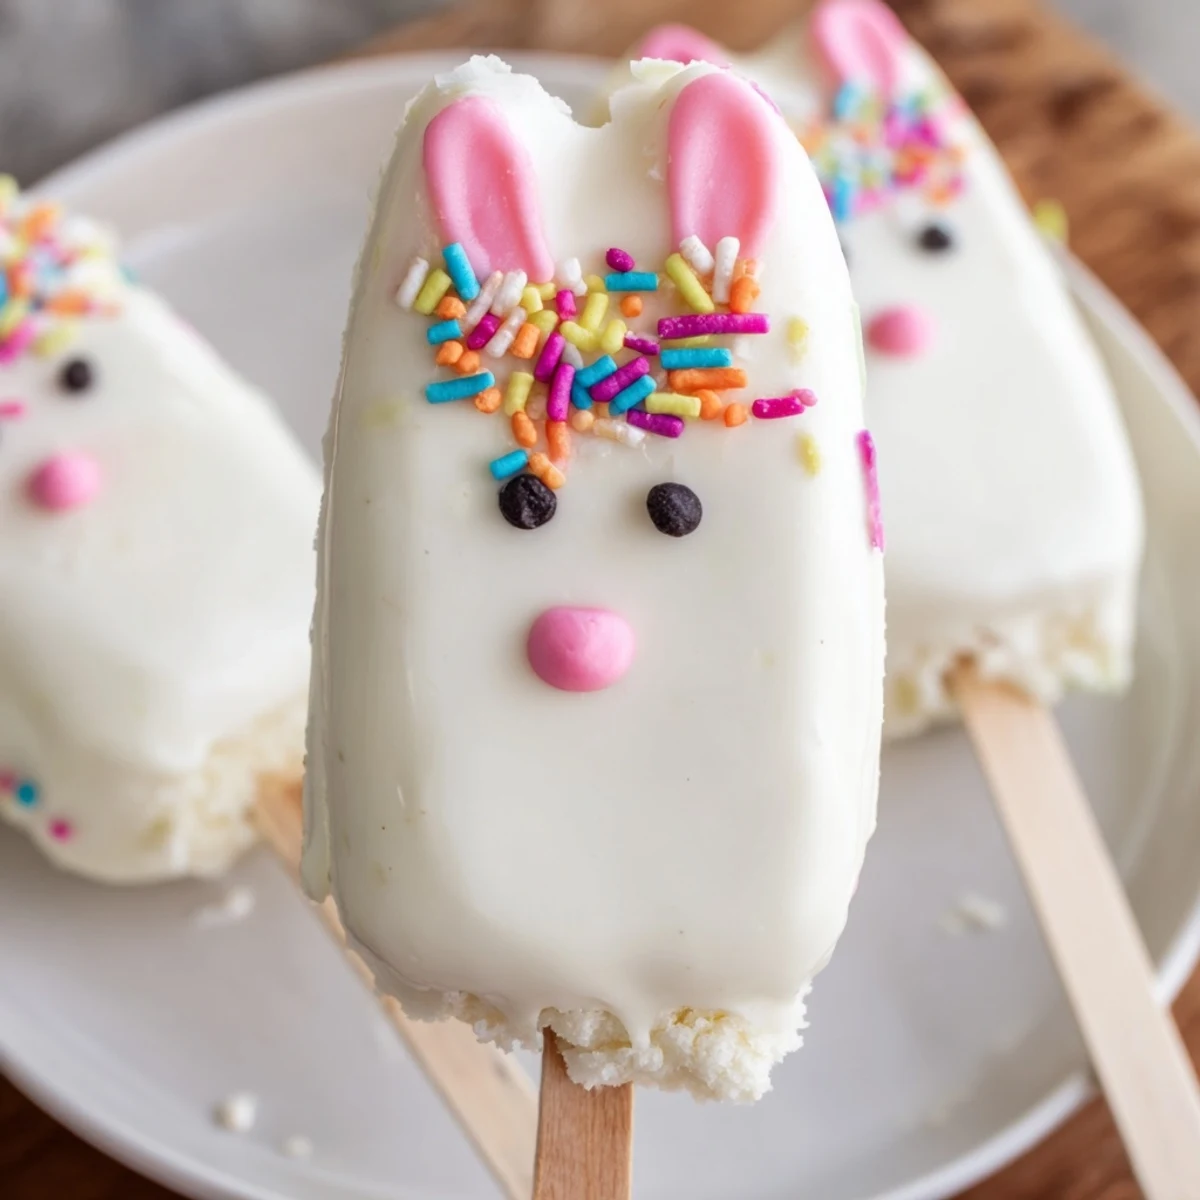
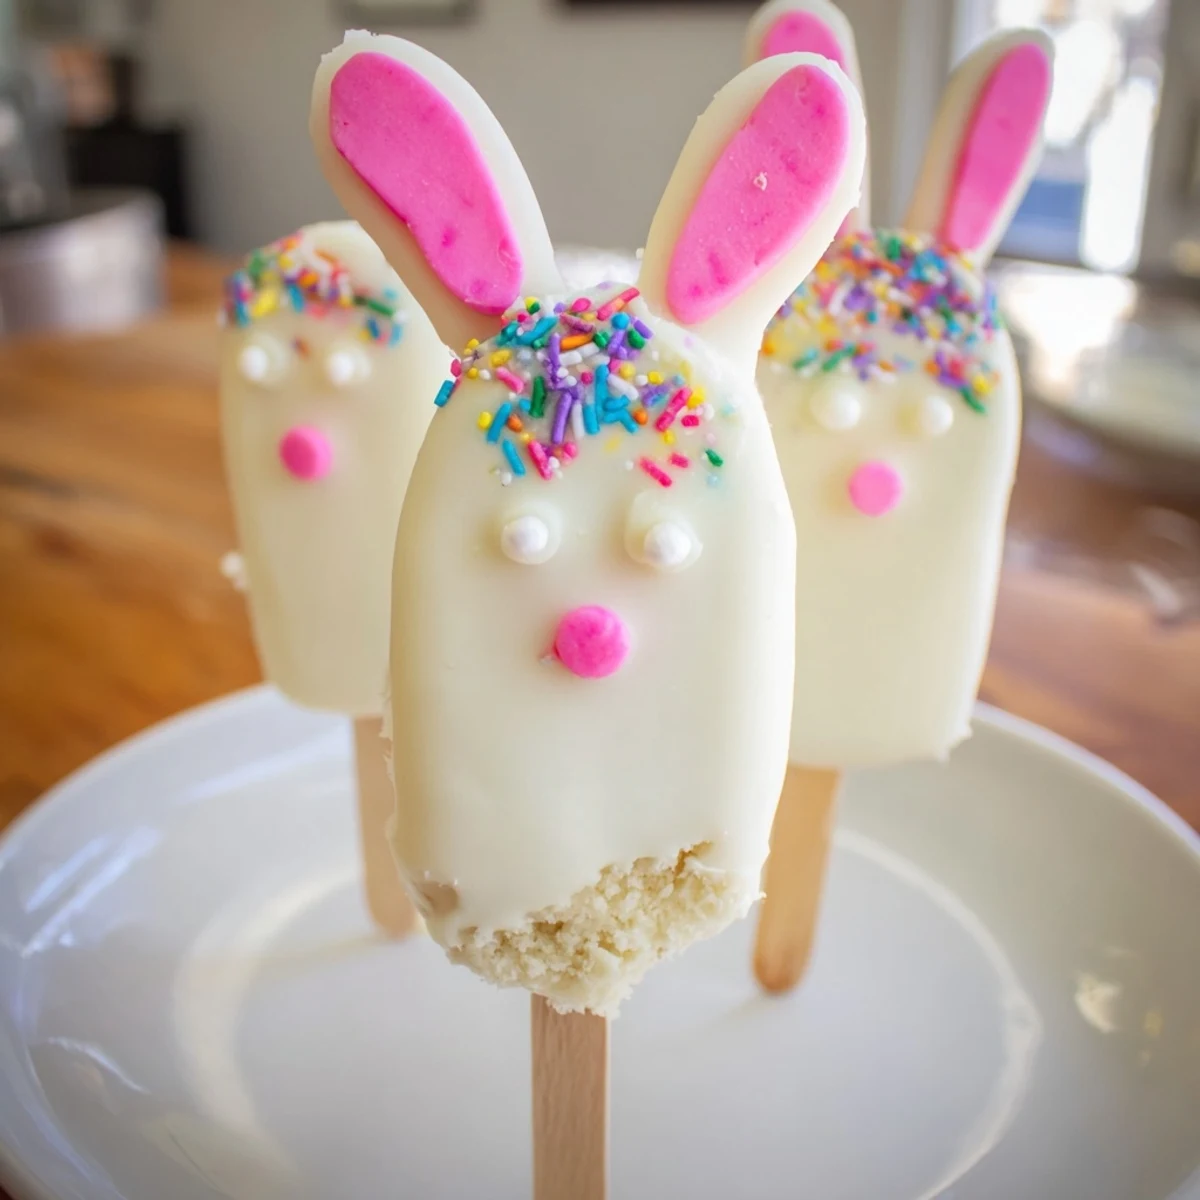
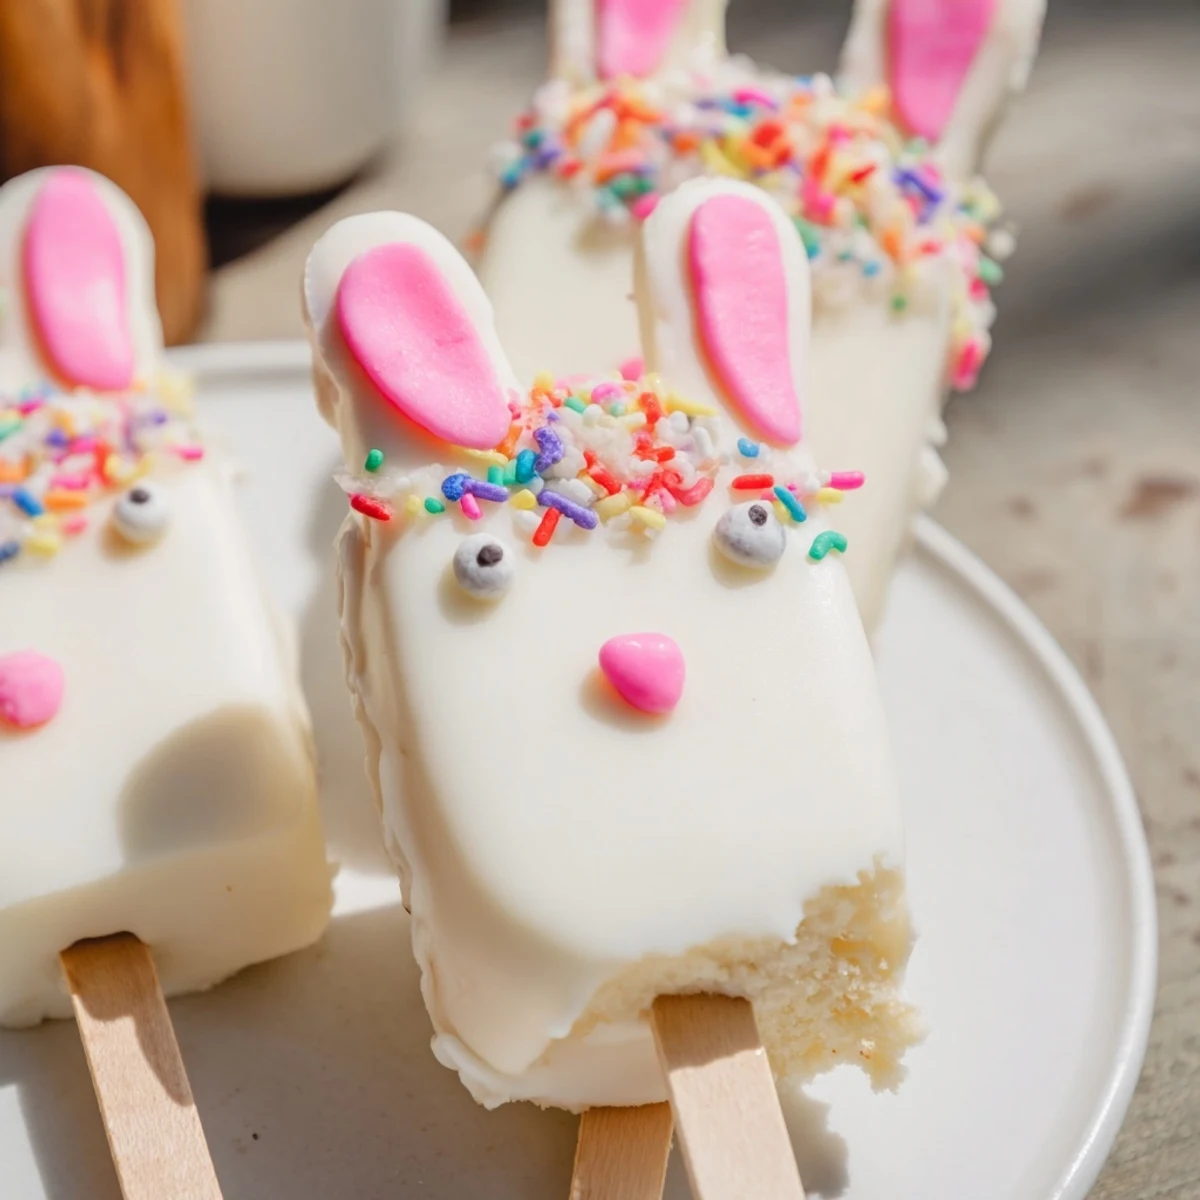
 Create adorable bunny-shaped cakesicles that combine crumbled vanilla cake with a rich white chocolate coating. These handheld desserts feature a moist, creamy interior made from cake crumbs blended with cream cheese and butter, then dipped in smooth white chocolate and decorated with festive Easter details.
The process involves mixing cake crumbs with binding ingredients to form a dough, shaping them into bunny faces, inserting sticks, and coating with melted chocolate. Decorate with candy eyes, sprinkles, or fondant ears and noses for a personalized touch. Each cakesicle offers the perfect balance of sweet cake and creamy chocolate coating.
These treats are ideal for Easter celebrations, spring parties, or as a fun baking activity with children. The recipe yields 8 cakesicles and takes about one hour from start to finish, including chilling time.
The kitchen counter was scattered with sprinkles and my three-year-old was practically vibrating with excitement. We'd decided last minute to make something special for Easter brunch, and these bunny cakesicles seemed like the perfect compromise between adorable and actually achievable. Halfway through shaping the first bunny face, she grabbed a handful of edible pearls and insisted they were bunny freckles. I went with it, and somehow those tiny additions made them feel like ours instead of just another Pinterest project.
Last Easter, my sister brought over her elaborate attempt at homemade cake pops that ended up looking like lumpy snowballs. We laughed until we cried, then spent the rest of the afternoon dipping whatever shape we could salvage into melted chocolate. That's when I realized the imperfections are what make these treats memorable. Now every time I see a slightly crooked bunny ear or a sprinkling gone rogue, I think of that afternoon and how the best desserts are the ones you make with someone you love.
Ingredients
- Vanilla cake crumbs: Save time by using leftover cake or grabbing unfrosted cupcakes from the bakery, though homemade buttermilk cake adds the most tender crumb
- Cream cheese: Room temperature is crucial here, or you'll end up with stubborn lumps that refuse to incorporate into the crumbs
- Unsalted butter: Softened butter helps the dough hold its shape without making it greasy, and salted butter would throw off the balance with the sweet coating
- Powdered sugar: This tiny amount sweetens the dough just enough so it stands up to the white chocolate without becoming cloying
- Vanilla extract: Pure vanilla makes a noticeable difference here since the flavor profile is so simple and delicate
- White chocolate: Real white chocolate tastes far superior to candy melts, though the melts are easier to work with if you're new to dipping
- Edible gel food coloring: Gel coloring won't seize your chocolate like liquid varieties can, and a tiny pink dot transforms a plain face into something instantly bunnylike
- Cakesicle sticks: Paper sticks work fine but wooden ones feel more substantial and hold up better if little hands get excited
Instructions
- Make the cake dough:
- Combine cake crumbs, cream cheese, butter, powdered sugar and vanilla in a medium bowl, mixing until everything comes together into a dough that holds its shape when you squeeze it.
- Shape your bunnies:
- Divide the dough into 8 equal portions and gently flatten each into an oval about 2 inches long, then use your thumb to slightly indent two ear shapes at the top.
- Add the sticks:
- Press a cakesicle stick about halfway into each bunny shape, wiggling it gently to secure, then refrigerate for at least 20 minutes until firm throughout.
- Melt the coating:
- Heat white chocolate in a microwave-safe bowl in 30-second bursts, stirring between each interval until completely smooth and glossy.
- Dip each cakesicle:
- Holding the stick, lower each bunny into the melted chocolate until fully coated, then gently tap against the bowl rim to let excess drip off.
- Add decorations quickly:
- While the coating is still wet, press candy eyes into place and add sprinkles or fondant ears before the chocolate sets and nothing will stick anymore.
- Let them set:
- Place finished cakesicles on a parchment-lined baking sheet and let stand at room temperature for about 30 minutes, or refrigerate for 10 minutes if you're impatient like me.
 Pin it
 My daughter now asks to make these every Easter, and I've learned that the tradition isn't about perfection. Last year she decided some bunnies needed sunglasses made from chocolate shards, and you know what, they looked fantastic. The best part is watching everyone at brunch choose their favorite based on whichever silly decoration catches their eye.
Making Them Your Own
Once you've mastered the basic dipping technique, try swirling a drop of pink or yellow food coloring into your melted white chocolate before dipping for a marbled effect that looks absolutely stunning. Chocolate cake crumbs work beautifully too, creating a cookies and cream vibe that adults always gravitate toward. I've even made these with lemon cake and added a tiny bit of lemon zest to the coating for spring brunches.
Storage Tips
These hold up surprisingly well for a couple of days, though the white chocolate coating can start to sweat if left at room temperature too long. I've found they're best stored in the refrigerator in an airtight container, which also helps the decorations stay in place. Just let them come to room temperature for about 15 minutes before serving so the chocolate isn't rock hard when you bite into it.
Kid-Friendly Assembly
The dipping part can get tricky for little hands, but decorating is where kids truly shine. Set up a decorating station with small bowls of sprinkles, candy eyes and fondant pieces, then let them go to town on the still-wet chocolate. Some of my favorite creations have come from kids who ignore the bunny concept entirely and make whatever they want.
- Have a damp paper towel nearby for sticky chocolate fingers
- Work with just 2-3 cakesicles at a time so the coating doesn't set before decorating
- Take photos of the finished creations because they're guaranteed to make you smile
 Pin it
 There's something deeply satisfying about handing someone a dessert on a stick, watching their eyes light up before they even take a bite. These bunny cakesicles have become our Easter signature, and I suspect they might just become yours too.
Recipe Q&A Section
- → What are cakesicles made of?
-
Cakesicles are created by combining cake crumbs with cream cheese, butter, powdered sugar, and vanilla extract to form a dough. This mixture is shaped, placed on sticks, and coated in melted white chocolate for a handheld dessert experience.
- → How long do bunny cakesicles need to chill before dipping?
-
The shaped cakesicles should refrigerate for 20-30 minutes until firm before dipping in melted chocolate. This chilling step ensures they hold their shape during the coating process.
- → Can I use different cake flavors for these Easter treats?
-
Absolutely! While vanilla cake crumbs create a classic base, you can substitute chocolate, lemon, red velvet, or any favorite cake flavor. Different cake varieties add unique twists to these festive bunny desserts.
- → What decorations work best for bunny cakesicles?
-
Candy eyes, sprinkles, and fondant bunny ears and noses create adorable faces. You can also use modeling chocolate or pretzel sticks for ears. Pink food coloring swirled into the white chocolate produces a lovely marbled effect.
- → How should I store white chocolate cakesicles?
-
Keep your cakesicles fresh by storing them in an airtight container in the refrigerator for up to 3 days. The cool temperature prevents the white chocolate coating from becoming soft and maintains the treats' shape.
- → Do I need a special mold to make bunny cakesicles?
-
While cakesicle molds help achieve uniform shapes, they're not essential. You can hand-shape the cake mixture into flattened ovals or bunny face forms. Molds simply make the process faster and ensure consistent sizes across all treats.
